DATABASE MAIL
- Databases
- November 04, 2024
-
DATABASE MAIL
Today we will learn about SQL Server Database Mail.
SQL Server Database Mail is a feature within Microsoft SQL Server that enables the database engine to send emails directly from within T-SQL code. It provides a convenient way to automate email notifications, alerts, reports, and other communications directly from the database server.
Database Mail sends email messages asynchronously in the background. To send an email message, you use the sp_send_dbmail system stored procedure. This stored procedure adds a request to a Service Broker queue and returns immediately.
=> How to configure database mail
Step 1: Go to Object Explorer in SSMS (SQL server management studio)
Step 2: Expand the management menu.
Step 3. Right-click on database mail and select configure database mail, as shown below.
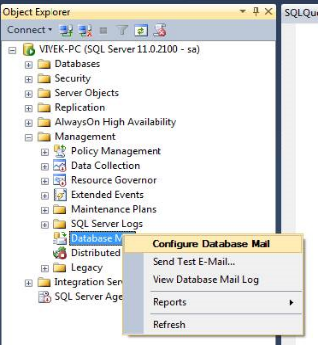
Step 4. Click the Next button and after clicking the next button; we will get a new screenshot, as shown below.
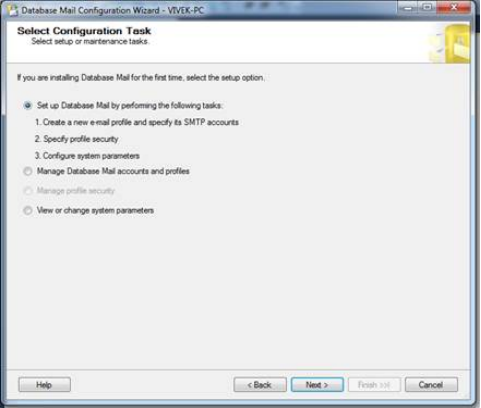
Step 5. Select the Radio button on the first option “Set up Database Mail by performing the following tasks” and click the Next button.
Step 6. Enter "Profile name" and "Description", as shown below:
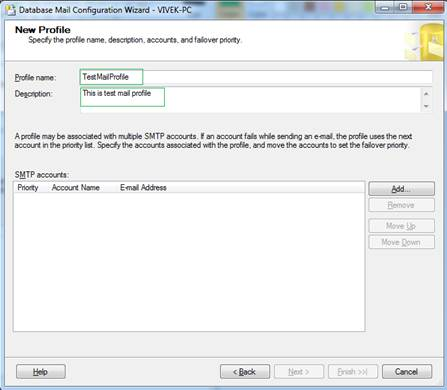
Step 7. Click ADD button and we will get a new prompt where we can add more details related to the mail setup, as shown below:
· Account name Enter the name of your new account.
· Description Enter a description for the account. It is optional.
· E-mail address Enter your e-mail address, which we will use for sending an e-mail, here you can specify your domain email id also as email@yourDomain.com.
· Display name Enter the name which will use for displaying the name of the sender and it is optional.
· Reply e-mail Enter the reply e-mail address, which will use for replies to e-mail messages sent from this account. It is also optional.
· Server name Enter the IP address of the SMTP server for your e-mail account.
This server requires a secure connection (SSL) - checked or unchecked as per your e-mail Domain.· SMTP Authentication We have to choose one Authentication type among three Authentication types.
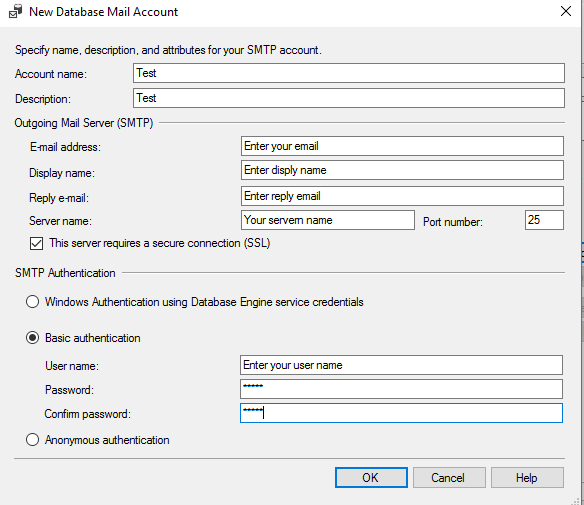
Step 8. Click OK. This screen will close and the previous screen is shown below.
Step 9. Click Next and we will get the prompt.
Step 10. Check the checkbox on “TestMailProfile” and make it the default profile, as shown below.
Step 11. Click Next and we will get a new screen.
Step 12. Keep the default setting for the system parameters and click the Next button.
Step 13. Click the Finish button to complete the configuration, as shown below.
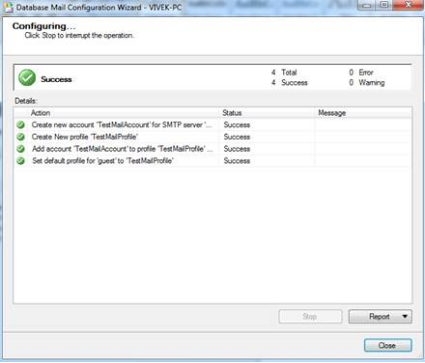
Step 14. It will do all the configurations and then click the close button.
Now, we are done with the mail configuration.
In the next part we will see how to test database mail.
Start Your Data Journey Today With MSAInfotech
Take the first step towards data-led growth by partnering with MSA Infotech. Whether you seek tailored solutions or expert consultation, we are here to help you harness the power of data for your business. Contact us today and let’s embark on this transformative data adventure together. Get a free consultation today!

We utilize data to transform ourselves, our clients, and the world.

Partnership with leading data platforms and certified talents


